Unlocking the Power of SBT: A Beginner's Guide to Understanding Not-So-Common Features
SBT: Unlocking its Power with Not-So-Common Features and Especially for Newbies
Travel | Movies | History | Nature
I am a software developer. Started my career as a Java developer, but later switched to Scala. I wish to write Scala articles which are easier for newbies to follow. I love to travel, prefer to be alone or in very small group. Love to watch movies/series.
1. Introduction
SBT is the most popular and de-facto build tool for Scala projects. It lets you write the build configurations using its Scala-based DSL. SBT is very powerful and can create very customizable multi-module builds. However, with great power, comes more complexities.
As a result, many people find it difficult to explore the full features of SBT when they start. Now, there are many tutorials available to make it easier to understand SBT. Moreover, the sbt documentation website also explains a lot of features in detail.
In this blog, I would like to cover some of the "hidden" or "not-so-common" features of SBT that might especially help the people coming to SBT from other build tools.
2. Command Alias
This might not be a hidden feature, but it is really useful. SBT lets us create an alias and combine multiple commands. This is extremely useful in creating different groups of functionalities and tasks.
Let's look at an example:
addCommandAlias("ci", ";clean;compile;test;")
Now, we can just execute the command sbt ci which performs clean, compile and run all tests. This makes it easier to customise and add more tasks to the same alias without affecting the usage. For example, we can later add formatting checks or linting checks to the alias and we don't need to make any changes in the CI pipeline.
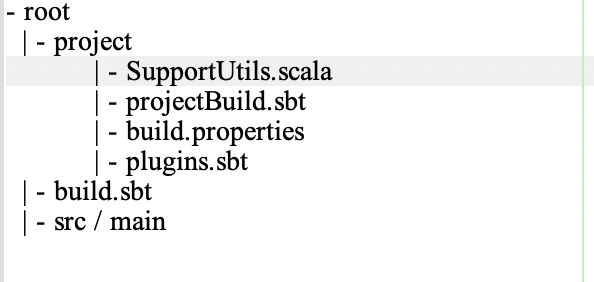
3. Nested Build Structure
SBT supports the nested structure of build configurations. Normally, we have a build.sbt at the root of the project. In this one, we are defining the build configurations. This build can internally refer to Scala classes placed within the project directory. It is also possible to define library dependencies for those Scala files that are inside project.
We can do that by creating another .sbt file inside the project directory and adding the libraryDependencies settings just like we do in a normal build. So here is the structure of the build:
Next, let's add fansi library in our case to the projectBuild.sbt:
libraryDependencies += "com.lihaoyi" %% "fansi" % "0.4.0"
We can now access this library within SupportUtils.scala file:
object Utils {
  def colorPrint() = println(fansi.Color.Yellow("This is printed in Yellow color"))
}
4. Custom Tasks
We can create custom sbt tasks to perform some operations. For example, we can create custom tasks to generate code or start/stop the dependent apps for tests and so on.
Let's create a task that starts up an embedded mongodb for the integration tests. We can first declare the task in our build.sbt:
lazy val startEmbedMongo = taskKey[Unit]("Start embedded mongodb for the CI tests")
Next, we need to define the logic for the task. For the sake of simplicity, I will be showing a basic case where the task just prints to log. However, this can be extended to any complex scenario.
Let's add the implementation for this task:
startEmbedMongo := {
  val log = streams.value.log
  log.info("Starting the embedded mongodb on port: "+port)
  EmbeddedMongoInstance.start(port)
}
The class EmbeddedMongoInstance is defined inside the project directory as mentioned in the previous section.
Similarly, we can define a task for stopping the embedded mongo instance:
lazy val stopEmbedMongo = taskKey[Unit]("Stop embedded mongodb after CI tests")
stopEmbedMongo := {
  val log = streams.value.log
  log.info("Stopping the embedded mongodb on port: "+port)
  EmbeddedMongoInstance.stop(port)
}
Now, we can run the tasks startEmbedMongo and stopEmbedMongo just like any other sbt command. We can combine these tasks using the command alias and this makes it very easy to execute the tests.
addCommandAlias("mongoTests", ";startEmbedMongo;it:test;stopEmbedMongo")
When we run sbt mongoTests, it starts the mongo database, then executes the integration tests and at last stops the mongo instance.
5. SBT Templates
We can utilize SBT templates to quickly bootstrap projects. We can use the command sbt new to using a template.
For example, to create an sbt project using the official Scala template, we can use:
sbt new scala/scala-seed.g8
This prompts for required inputs and then create the sbt project. We can also create custom templates and distribute them. You may refer to this blog for more details regarding the custom Gitter8 template.
6. Integration Tests
Note: From SBT 1.9 release onwards, IntegrationTest setting has been deprecated. The official suggestion is to create a new sub-project for keeping integration tests. However, I prefer to use a custom config instead(esp in one of my projects where there are too many sub-modules already).
We generally have a separation between unit tests and integration tests. When we run sbt test, it runs all the tests within the test directory(for e.g: src/test/). In sbt, we can separately set up the integration test scope. For that, we need to enable it by adding the config to the build setup. Let's look at it with an example. Here is a sample build configuration that enables integration tests:
lazy val scala2 = project
  .in(file("scala2"))
  .configs(IntegrationTest)
  .settings(
    name := "scala2",
    Defaults.itSettings,
    libraryDependencies ++= Seq(
        "org.scalatest" %% "scalatest-flatspec" % "3.2.15" % "test,it"
    )
  )
In the above build setup, we add the integration test configurations using configs(IntegrationTest). This brings the scope it to the project. We then use the settings Defaults.itSettings to the build settings to enable sbt to compile the integration test sources. When we add the library dependencies, we can additionally pass the scope test,it so that scalatest library is available for both scopes.
With this setup, we can add the integration test to the directory src/it/. Note that, compile scope uses the source files from the directory src/test. Let's add a very basic test to run:
package com.yadavan88
import org.scalatest.flatspec.AnyFlatSpec
class SampleIntegrationTest extends AnyFlatSpec {
  it should "run integration test" in {
    println("Running tests in integration test scope")
    succeed
  }
}
This file is placed under the path scala2/src/it/scala/com/yadavan88. Notice that when we execute the tests using sbt test, this test is not executed.
To run the integration test, we can use the command sbt IntegrationTest/test(previously, it:test,but : approach is deprecated). This way we can separate unit and integration tests cleanly.
7. Custom Profile
SBT also allows us to create custom profiles, similar to the inbuilt IntegrationTest. Assume that we have a few sets of tests that are manually running in some environments and we don't want to mix up with the unit and integration tests. We can create a custom profile to manage these tests.
Let's create a profile as manual and we need to run these tests using the command sbt Manual/test on demand. Also, these tests should be separated from other unit and integration tests.
Let's start with creating the config:
lazy val ManualTestConfig = config("manual") extend (Test)
This creates a new config ManualTestConfig by extending the built-in Test config. We can also extend from IntegrationTest. This creates the prefix Maunal/ similar to IntegrationTest/ and Test/. We can then create the settings for this profile:
lazy val manualTestSettings = inConfig(ManualTestConfig)(Defaults.testSettings)
This creates the compilation settings for the new profile. As a final step, we need to apply this to the build configuration:
lazy val scala3 = project
  .in(file("scala3"))
  .configs(ManualTestConfig)
  .settings(
    name := "scala3",
    scalaVersion := "3.2.2",
    manualTestSettings,
    libraryDependencies ++= Seq(
      "com.softwaremill.diffx" %% "diffx-core" % diffxVersion,
      "org.scalatest" %% "scalatest-flatspec" % "3.2.15" % Test
    )
  )
With this, the new manual profile is added to the scala3 project. Now we can add the test to the directory src/manual/scala/ :
package com.yadavan88
import org.scalatest.flatspec.AnyFlatSpec
class ManualTest extends AnyFlatSpec {
  it should "run the tests from manual profile" in {
    println("Running this test only from manual profile")
    succeed
  }
}
After that, we can run the test using the command Manual/test. This runs all the tests from the manual scope.
Note: Previously SBT used to use : based approach such as test:compile, it:test and so on. However, this format is now deprecated and suggested approach is Test/compile , IntegrationTest/test.
8. OnLoad Operations
We can perform some operations on startup of sbt session in the project. This is especially useful to write some files on the startup that can be used within the project. For example, we can create git commit hooks automatically.
Let's look at a simple example where we create a text file on startup:
Global / onLoad ~= { state =>
  import java.nio.file._
  import java.time.LocalDateTime
  val dummyFile = Paths.get(".dummy")
  Files.write(
    dummyFile,
    s"This is a dummy content written on startup : ${LocalDateTime.now}".getBytes
  )
  state
}
Whenever sbt is started, it creates/overwrites the file .dummy. This logic can then be extended to create git commit and push hooks.
9. Conclusion
In this blog, we looked at some of the not-so-common features of the SBT. There are many more features available in SBT, that are not covered. Advanced SBT users might be already familiar with all the mentioned features. However, this might not be very obvious for newbies to SBT.
The sample settings and code used here is available here on GitHub.